- Products

For All of Your BBQ Needs
We stock all of your major brands at competitive prices. Buy online or come in store today!
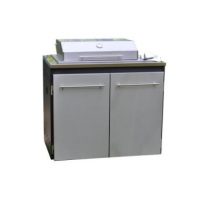
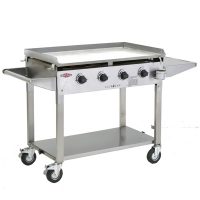
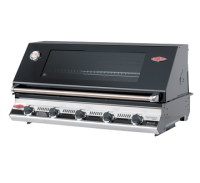
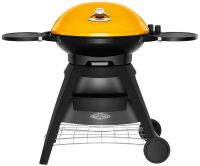
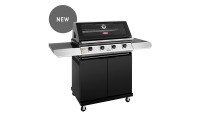
Beefeater Clubmate

Beefeater Clubmate
Beefeater BBQ'S, BBQ Perth, Trolley BBQ's, Flat Plate BBQ's.$799.00
Available on back-order
- Type of BBQFree Standing
- Finishpowder coated, Black
- Design FamilyClubman
- Total height (with lid closed) (mm)830
- Total height (mm)830
- Total width (mm)920
- Total depth (mm)520
- Controls of BBQRotary Knob
- Hotplates1
- Hotplate finishCast Iron
- Position of controlsfront mounted
- Slimline LidYes
- Features of lidremovable
- Type of FuelGas
- NG conversion kit availableavailable through spare parts
- Number of burners4
- Burner materialCast iron
- Type of IgnitionPiezo
- Burner power (MJ/hr)18
- Total burner power (MJ/hr)72
- Flame failureNo
- Side BurnerNo
- Trolley typeOpen Trolley
- Trolley constructionBlack, Powder Coated Steel
- Features of trolleyshelf
- Trolley wheels and feetlockable castor wheels
Related products
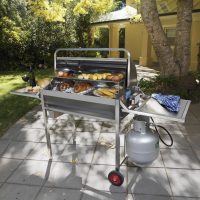
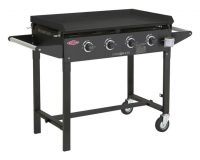
Gasmate Caterer 6

Gasmate Caterer 6
BBQ Perth, Trolley BBQ's, $700-$1200, Flat Plate BBQ's.$1,079.00
Available on back-order
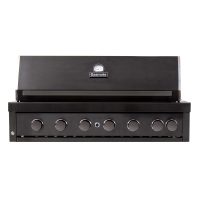
CATERER 6 BURNER BBQ
Model No. BQ3465
The newly updated Caterer is the ideal heavy duty BBQ for sporting and social clubs or anywhere large groups are entertained.
It features a new black powder coated front fascia and matching black powder coated storage rack and black knobs with chrome bezelled detail.
FEATURES
|
Includes LCC27 Safe Lok regulator & hose |
|
6 burners provide 84 MJ/h of heat output |
|
Solid 5mm thick mild steel hotplate |
|
Big cooking space – 1200mm x 450mm cooking surface |
|
Sure-fire rotary piezo ignition for easy lighting |
|
Solid trolley with castors for easy moving, foldable side shelves, cylinder storage hook and updated solid storage rack |
|
Heavy duty lid that acts as a windshield |
|
New stainless steel warming rack to heat food or keep food warm |
|
Gas certified to Australian Standards |
SPECIFICATIONS
|
Description |
Caterer 6 Burner BBQ |
|
Body Finish |
High temperature powder coat |
|
Ignition |
Sure-fire rotary piezo ignition |
|
Main Burners |
6 x stainless steel |
|
Total MJ/h Rating |
84 MJ/h |
|
Cooking Surface Finish |
Solid 5mm thick mild steel hotplate |
|
Cooking Surface Configuration |
Fixed hotplate |
|
Total Cooking Area (mm) |
1200 W x 450 D |
|
Overall Dimensions (mm) |
1817 W x 579 D x 956 H |
Related products
Heatlie Snappy King


Heatlie Snappy King
Commercial and Park Style BBQ's, Flat Plate BBQ's.$3,299.00
Heatlie BBQs, available at Barbecue Bazaar, offer unparalleled grilling experiences, combining innovative design with exceptional durability to elevate every outdoor cooking event.
Snappy King
The best outdoor oven on the market! Anything you can cook in an indoor over can be cooked in this easy to clean, simple to use outdoor oven.
COOKING GUIDE
FEATURES
Related products


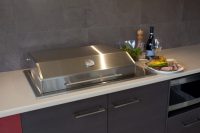
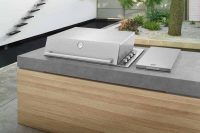
Heatlie Island Gourmet Elite


Heatlie Island Gourmet Elite
BBQ Perth, Flat Plate BBQ's, Inbuilt BBQ's Perth.Heatlie Island Gourmet Elite 600 and 850 BBQ – AUSSIE MADE!
Available in two sizes, this barbecue can be easily incorporated into your Outdoor Kitchen. A first for the bbq market, The Heatlie Island Gourmet Elite (IGE) is designed to be dropped into a bench top made from any material, including combustible materials such as wood. It has been specially designed to be installed with minimal fuss. The IGE comes standard with a flat lid. See “Features” tab for additional accessories. You can also purchase the Heatlie Island Gourmet cabinet which has the necessary ventilation requirements as specified by the Australian Standards.
FEATURES
INSTALLATION
COOKING GUIDE
FAQ
Related products

Heatlie Flat Plate BBQ’s


Heatlie Flat Plate BBQ’s
Flat Plate BBQ's.Heatlie BBQs are the toughest barbecues around. Originally designed for professional chefs, the full range of Heatlie BBQs are now available for you to enjoy at home. Available in 3 sizes and a choice of stainless steel or powder coated finish, you’re bound to find a Heatlie BBQ which looks fantastic in your outdoor kitchen or backyard. All Heatlie barbecues feature our unique burner system which uses precision machined burners to produce a more even heat than other barbecues.
INSTALLATION
COOKING GUIDE
FAQ
Related products
Hercules In-Built

Hercules In-Built
BBQ Perth, Flat Plate BBQ's, Inbuilt BBQ's Perth.$2,290.00
Available on back-order
Whether it is for the school, footy club, workplace or home nothing beats the Leisure Time Hercules for raw power, solid quality and simple convenience.
Click here for a brochure, or read below for more information
Features
- Huge, 6mm thick solid steel hotplate with a cooking area of 1100 x 560mm
- Four strong cast iron burners for a high level of heat control and excellent heat conduction and heat efficiency.
- Large fat drainage channel for easy fat removal
- Large fat collection tin that holds up to 1.5L of waste for safe storage and easy cleaning.
- Electronic ignition for easy lighting.
- Recessed burners for safe transport.
- Commercial grade castors and wheels for easy manoeuvrability.
- Available as an inbuilt model or with a trolley.
- Available to run on LPG or natural gas
Options available:
The HERCULES is also available as an inbuilt BBQ and with several optional extras:

Inbuilt HERCULES
The Inbuilt Hercules is perfect for building into brick areas or trailer installations. The strong stainless steel frame will not rust even if the BBQ is left out in the open for extended periods.

Lids
Stainless steel and powder coated lids to keep rain and weather off the hotplate. We highly recommend a lid to help keep the hotplate in good condition for years on end.

Spatter guard/windshield
A stainless steel spatter guard will stop fat spatter from landing on walls, the ground or people. It also acts as a windshield, helping keep the food warm and clean on windy, dusty days.

Stainless steel side tables
A solid stainless steel side table makes a useful addition to the Hercules BBQ. It provides space for preparing food and for holding utensils such as tongs as well as plates, serviettes and plates.
Related products
Hercules

Hercules
BBQ Perth, Flat Plate BBQ's.$2,550.00
Whether it is for the school, footy club, workplace or home nothing beats the Leisure Time Hercules for raw power, solid quality and simple convenience.
Click here for a brochure, or read below for more information
Features
- Huge, 6mm thick solid steel hotplate with a cooking area of 1100 x 560mm
- Four strong cast iron burners for a high level of heat control and excellent heat conduction and heat efficiency.
- Large fat drainage channel for easy fat removal
- Large fat collection tin that holds up to 1.5L of waste for safe storage and easy cleaning.
- Electronic ignition for easy lighting.
- Recessed burners for safe transport.
- Commercial grade castors and wheels for easy manoeuvrability.
- Available as an inbuilt model or with a trolley.
- Available to run on LPG or natural gas
Options available:
The HERCULES is also available as an inbuilt BBQ and with several optional extras:
Inbuilt HERCULES
The Inbuilt Hercules is perfect for building into brick areas or trailer installations. The strong stainless steel frame will not rust even if the BBQ is left out in the open for extended periods.
Lids
Stainless steel and powder coated lids to keep rain and weather off the hotplate. We highly recommend a lid to help keep the hotplate in good condition for years on end.
Spatter guard/windshield
A stainless steel spatter guard will stop fat spatter from landing on walls, the ground or people. It also acts as a windshield, helping keep the food warm and clean on windy, dusty days.
Stainless steel side tables
A solid stainless steel side table makes a useful addition to the Hercules BBQ. It provides space for preparing food and for holding utensils such as tongs as well as plates, serviettes and plates.
Related products
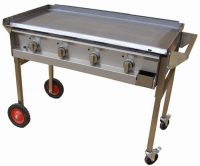
Beefeater Stainless Steel Clubman


Beefeater Stainless Steel Clubman
Beefeater BBQ'S, Flat Plate BBQ's.$1,899.00
Available on back-order
Stainless Steel Clubman 4 Burner (includes Weather proof lid) BD16440 |
Need to cook up a storm for the kids at soccer practice or cook for a cast of thousands at your next club event? No problem. The freedom is yours wth the new BeefEater Clubman. This mobile wonder with convenient folding legs is great for any occassion both near and far. Its practical, robust design and massive cooking area is sure to cook up a feast at any function or event.
Features
| BTU | 68,242 BTU |
| Heat Source | Gas |
| Ignition | Quartz Start Ignition |
| LPG Gas Hose & Regulator | Yes |
| MJ/HR | 72mj/hr |
| Number of Burners | 4 Burners |
| Trolley Material | Removable Stainless Steel Plate |
| Type of Barbecue | Mobile |
| Type of Burners | Cast Iron |
| Stainless Steel | |
| Type of Trolley | Open Trolley |
| Vaporizers | N/A |
| Warming Rack Included | No |
| Warranty | Limited 12 month warranty |
| Weight (approx) | 75 kg |
| Wheels | Heavy duty castor wheels with locking brake |
Size
(HxWxD); 830mm / 32.7” x 920mm / 36.2” x 520mm / 20.5”
Downloads
Related products
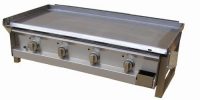
Beefeater Clubman


Beefeater Clubman
Beefeater BBQ'S, Flat Plate BBQ's.$999.00
Clubman 4 Burner – (Includes Weather proof lid) BD16640 |
Need to cook up a storm for the kids at soccer practice or cook for a cast of thousands at your next club event? No problem. The freedom is yours wth the new BeefEater Clubman. This mobile wonder with convenient folding legs is great for any occassion both near and far. Its practical, robust design and massive cooking area is sure to cook up a feast at any function or event.
Features
| BBQ Frame | Fully Welded Steel |
| BTU | 68,242 BTU |
| Cook Tops | Removable solid steel plate |
| Heat Source | Gas |
| Ignition | Quartz Start Ignition |
| LPG Gas Hose & Regulator | Yes |
| MJ/HR | 72mj/hr |
| Number of Burners | 4 Burners |
| Trolley Material | Steel |
| Type of Barbecue | Mobile |
| Type of Burners | Cast Iron |
| Type of Trolley | Open Trolley |
| Vaporizers | N/A |
| Warming Rack Included | No |
| Warranty | Limited 12 month warranty |
| Weight (approx) | 75 kg |
| Wheels | Heavy duty castor wheels with locking brake |
Size
(HxWxD); 830mm / 32.7” x 920mm / 36.2” x 520mm / 20.5”
Downloads
Related products


Stockists of All Major Brands


Latest news, events & specials